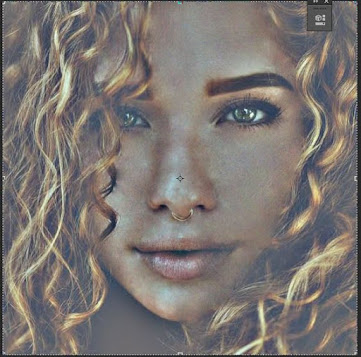
Skin retouching has become a popular practice in photography because everyone wants to look attractive in the shot. However, many upcoming photographers seem not to have the required skill of making this happen. But in this article, Seven steps to retouch skin on photoshop will be carefully highlighed. And the below pictures depicts both the original and outputs of the images retouched on Photoshop.
 |
| Original vs Retouched |
 |
| Original image |
 |
| Final or Retouched image |
Now Let's get started!!
STEP 1
Insert your image in Photoshop. The image is displayed as a layer on Photoshop
> Duplicate the layer (press Ctrl+J). Obviously you'll see two layers on your layer panel.
>Rename the top layer or the duplicate as "Spot Healing Layer" and click "ok".
>Select the Spot Healing layer
>While on the Spot Healing layer, Go to the tool bar at the left hand side of the photoshop and select "Spot Healing Brush"
>After selecting Spot Healing Brush, There are 3 options to choose from based on what you are to achieve: Proximity match, Create texture and Content aware.
>Select the "Content aware" option and set the brush blending mode to "Normal".
> Adjust the brush size to be a little bigger than the blemishes to remove on the image skin.
STEP 3
>Heal the blemishes on the image by placing the brush circle around the blemish and click on it.
>Click over the blemishes one after the other until you obtain an image as fine as possible.
 |
| Post spot healing image |
STEP 4
>Select the Soft Skin layer and select "Filter" at top of photoshop >Other and select High Pass
>Select the High Pass radius to 24. Note to use a value divisible by 3 e.g 18, 21, 24 etc.
 |
| After High Pass >Add "Guassian blur" and set the radius to 8 which is one-third of the High Pass Value. |
>Change the Soft Skin layer blending options from "Normal" to "Linear Light". Right Click on the layer to do this.
 |
| Post-G. Blur and Linear light mode |
STEP 5
>While on smooth skin layer, Go to Image> Adjustment and select "Invert"
>On this layer, go to blending option and work on "Blend if Gray" setting
>You'll see "this layer" and "under layer". Adjust the "This layer" to remove white and dark shade on the inverted image.
>Click Alt+Win and drag down the half white cursor from the right to left till the white fadesand repeat same for black cursor as well.
STEP 6
>On Soft Skin layer, Add vector mask (Alt+Win+add vector mask) and set the Foreground color to White at the base of the tool bar.
>Select brush tool from the tool bar to paint over the skin.
STEP 7
>Paint over the forehead, chicks and other area. View the progress of the of your painting by holding Alt+Win and click on the vector mask.
>Then reduce the opacity of Soft Skin layer to 50%.
>Go to layer> adjustment layer and select "Curve" to improve the color of the image.
 |
| Retouched image/final output |
And with that we are done.
Note: I get a commission when you purchase products via my link.


Comments
Post a Comment